
You went looking for the reviews setting in your Shopify admin. You checked Settings, then the product page, then the theme editor. It is not there.
That is not you missing something. Shopify does not ship a product reviews system. Its own free Product Reviews app was delisted from the App Store in September 2023 and stopped displaying reviews entirely on May 6, 2024. Every store that launched after that date starts with nothing: no stars under the product title, no reviews block, and no way for a customer to leave feedback.
Working out how to add reviews to Shopify is one of the first real jobs a new owner has to do without Shopify holding their hand. The good news is that on most themes it takes about twenty minutes and no code.
The confusing part is that there are three routes, and which one applies to you depends on something you have probably never checked: the architecture version of your theme. Guides that skip that step are why so many people end up staring at a sidebar that looks nothing like the screenshots.
This post ranks the three routes by effort, shows you how to tell in thirty seconds which one is yours, and covers the part almost nobody explains: where the reviews block actually belongs on the page. It ends with the two mistakes that quietly undo the whole setup after you have done it correctly.
What Shopify actually gives you
Out of the box, a new Shopify store has product pages, collection pages, a cart and a checkout. It has no review collection, no review storage, and no star rating anywhere.
Stores that used the old Product Reviews app were told to export their reviews before the cutoff and move to a third-party app. Many did not notice until the reviews stopped rendering. If you inherited a store from that era, there may still be leftover review code sitting in the theme files, which matters later in this post.
For a store launched in the last twelve months, the practical translation is simple. Reviews are an add-on, the add-on is free at the volume you are doing, and the only real work is deciding where the pieces go on the page.
One thing worth saying plainly before you start: adding the section is the easy half. Filling it is the slower half, and no app does that part for you.
Which theme do you have? Check this first
Shopify themes come in three architecture generations, and each one gives you a different set of options. Shopify's own documentation splits them into Vintage themes, Online Store 2.0 themes, and the newest generation that supports theme blocks, which includes the Horizon family.
Here is the thirty second test. In your admin, go to Online Store, click Edit theme, then use the template dropdown at the top to select Products, then Default product. Look at the sidebar. If there is an Add section button under the list of sections, you are on Online Store 2.0 or newer. If there is no Add section button, you are on a Vintage theme.
| Theme generation | How you can tell | Your route |
|---|---|---|
| Vintage | No Add section button on the product template. No Apps tab in the block picker. | Route 1 by Liquid, or switch themes |
| Online Store 2.0 | Add section button present. No blocks folder in the code editor. | Route 1 |
| Theme blocks (Horizon family) | A blocks folder appears in the theme code editor sidebar. | Route 2 |
If you are on a Vintage theme, the honest advice is to move to a current one rather than fight it. Shopify's free Vintage themes only receive security fixes now, and every app you install for the next few years will assume the newer architecture.
Route 1: A reviews app and two theme blocks
This is the route for the large majority of stores, and it is the one to pick unless you have a specific reason not to. Install a reviews app, then place two separate blocks in the theme editor.
Two blocks, not one. That is the detail most guides skim past, and it is why people install an app and then wonder why the stars never appear under the product title.
Which app should a new store install?
Judge.me is the default recommendation for any store doing under roughly 200,000 dollars a year. Its Free plan includes the review widget, the star rating badge, CSV imports, photo and video review requests, and unlimited review request emails, with no order cap. The paid tier is a flat 15 dollars a month regardless of volume.
Loox, Stamped and Yotpo are all reasonable, and each is better than Judge.me at something specific. If you want the longer version, I compared Judge.me, Loox, Stamped and Yotpo honestly for stores under a million a year. But if you are here because you have zero reviews and want stars on the page today, install the free one and move on.
Step one: turn on the app embed
App embeds are the background scripts an app needs in order to run. They are separate from app blocks, which are the visible pieces you place on the page, and Shopify treats them as two different things in the theme editor.
In the theme editor, click the App embeds icon in the left rail, find your reviews app, toggle it on and save. Skip this and your widgets will render as empty headers with no reviews inside them. This is the single most common cause of "I installed the app and nothing shows."
Step two: put the star rating under the product title
Still in the theme editor, select Products, then Default product. Open the Product information section in the sidebar, find the Title block, hover just underneath it and click the plus icon. Open the Apps tab and choose your app's star ratings block. Judge.me documents this exact path, and the other apps follow the same pattern.
Note that this block goes inside an existing section, not as a section of its own. That nesting is what trips people up.
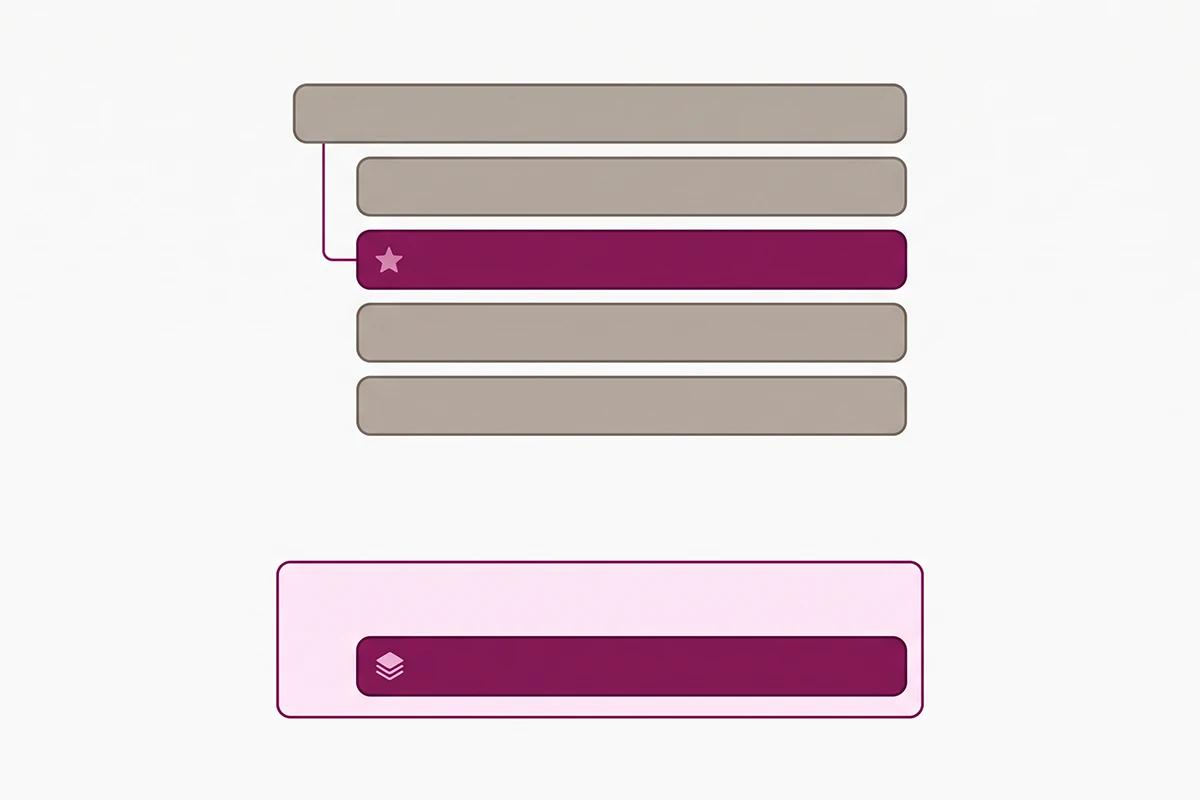
Step three: add the review widget as its own section
Scroll to the bottom of the same sidebar, click Add section, open the Apps tab and choose the review widget. This is the full block: the list of reviews, the rating breakdown, the photos, and the Write a review button. Drag it to sit below your product description.
Save, then open the live product page in a private browser window. If the stars are under the title and the widget is below the description, you are done with the hard part.
Route 2: Horizon-era themes
If your check turned up a blocks folder, you are on the newest theme generation. That currently covers ten themes: Horizon, Tinker, Ritual, Fabric, Pitch, Dwell, Savor, Heritage, Atelier and Vessel.
The steps are close to Route 1, and the app embed still has to be on. What changes is the sidebar. Theme blocks nest up to eight levels deep, so the tree is longer and the plus icons appear in more places. You will spend more time hunting for the right insertion point and less time wondering whether the block exists.
The bigger difference shows up on collection pages. Because the product card in a Horizon theme is itself made of blocks, you can drop a star rating badge directly under the price on the card, which older themes could not do without code. Open Collections, then Default collection, expand the Collection section, hover under the Price block and add the star ratings block from the Apps tab.
Worth knowing before you do it: those collection page stars are for shoppers browsing a grid. They will not earn you anything in search results, for reasons covered further down.
Route 3: A testimonials section with no app at all
There is a version of this job that involves no app and no review collection: a static section where you type in quotes by hand.
Some themes ship a testimonials or quote section. Many, including Dawn, do not. When yours does not, the workaround is the Multicolumn section, which takes Column blocks with a heading, an image and a body of text. Add it, add three or four columns, put the customer quote in the text field and the name in the heading, then rename the section in the sidebar so you can find it again.
Here is what you are giving up, stated plainly rather than buried. No stars in Google, because there is no structured data behind hand-typed text. No verified buyer badge, so a sceptical shopper has no reason to believe the quotes are real. No automatic collection, so every new quote is a manual edit. And it stops scaling somewhere around six quotes, because you are duplicating the section on every template where you want it.
This route is right for exactly one situation: you have genuine feedback from a handful of early customers, it arrived by email or DM rather than through a review form, and you want it visible on the homepage this afternoon. If that is you, also read how to get your first reviews with zero sales, because the section is only worth building if you have a plan to fill it.
Where should the reviews section go?
Placement decides whether the work you just did does anything. A review widget nobody scrolls to is the same as no reviews at all.
The pattern that works on product pages is two-part. The star rating and review count sit directly under the product title, in the first screen, where they answer the shopper's first question before they ask it. The full widget sits lower, below the description, where someone who has already decided to take the product seriously goes to read the detail.
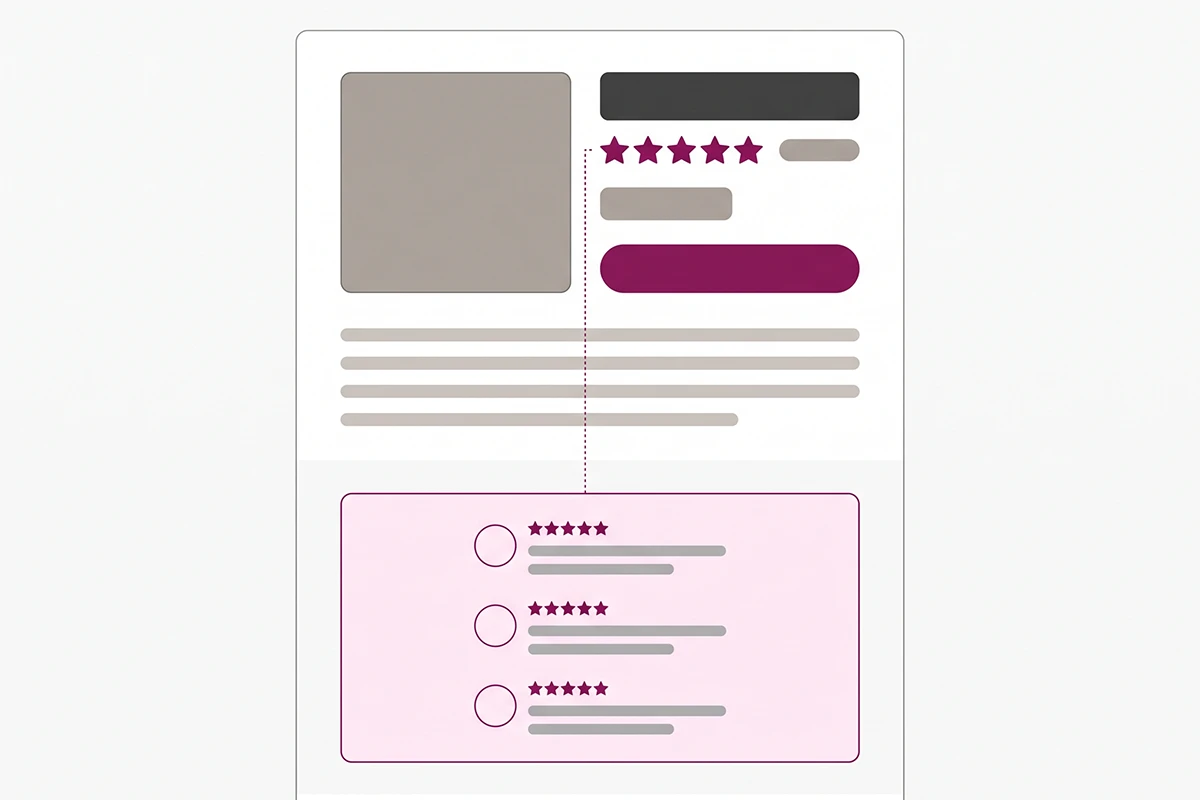
On the homepage, most apps offer a reviews carousel you add through Add section. Judge.me's version shows the fifteen most recent published five-star reviews by default, which is fine as a starting point but worth curating once you have enough to choose from.
One rule that saves people a lot of confusion. Stars on your homepage and collection pages will never produce a star rating in Google search results. Google's review snippet guidelines ask that review markup describe a specific item rather than a category or a list of items, and they require the review content to be visible on the page it is marked up on. Homepage and collection placements are for the shopper. Search stars come from the product page. I went into the full placement question in where reviews should sit on your homepage and collection pages.
Two mistakes that quietly break the setup
Both of these show up weeks after the setup, which is what makes them annoying.
Two sets of stars on the same product page
Most modern Shopify themes ship their own Product rating block, which reads Shopify's native rating metafield. When you add your app's star ratings block, the theme's block is still there, and the shopper sees two rows of stars that often disagree with each other.
The fix takes ten seconds. Open Products, then Default product, find the Product rating block inside Product information, and delete it. Keep your app's block. The same problem happens on a larger scale if you install a second reviews app while testing, so pick one app, import the other's reviews by CSV, and uninstall the one you are not keeping.
The section that disappears when you change themes
App blocks live inside a theme, not inside your store. Switch themes, or accept a major theme update, and the blocks do not come with you. Shopify states this directly: apps installed for one theme have to be re-activated in a new published theme.
Your reviews are safe throughout, because they sit in the app's database. What vanishes is the display. Before you publish a new theme, open it as a draft, re-place both blocks, and check a product page in preview. While you are in there, it is a reasonable moment to check what your review app is doing to your load time.
Wrapping up
Three things worth carrying out of this post.
First, check your theme architecture before you follow anyone's instructions, including mine. It is a thirty second test and it decides which of the three routes you are on.
Second, the reviews section is two blocks in two different places, not one. The star rating goes inside Product information under the title. The widget goes below the description as its own section. Miss the app embed toggle and neither one will load.
Third, placement is not decoration. Stars in the first screen change behaviour. A widget at the bottom of a long page mostly does not.
What this post does not solve is the part that comes after: actually getting reviews into the section you just built. That is a different job, and it is the slower one. If your store has no orders yet, start with the zero-sales playbook rather than waiting for reviews to arrive on their own.
If you would rather not do any of this yourself, Reviews Management covers the setup and the collection side together.
Want the reviews setup handled for you?
Reviews Management covers the app setup, the widget placement, the request automation, and the replies afterwards. You end up with a reviews section that is live, sitting where shoppers actually look, and collecting on its own.
See how Reviews Management works →Or email contact@studioniza.com if you have a specific question about your store. I read every one.
Frequently asked questions
If you're still unsure after reading these, just send the question.
Can I add reviews to Shopify without paying for an app? +
Yes. The free tiers of the main review apps cover everything in this post, including the review widget, the star rating badge, CSV imports and unlimited review request emails. Judge.me publishes a Free plan with no order cap, and its paid tier sits at a flat 15 dollars a month. You can also build a static testimonials section with no app at all, though you give up star ratings in Google and any automatic collection.
How long does it take to add a reviews section to Shopify? +
About twenty minutes on an Online Store 2.0 or theme-block theme, most of which is deciding where the blocks should sit. Vintage themes take longer because the blocks have to be pasted into Liquid files by hand. If you are learning how to add reviews to Shopify for the first time, budget an hour so you are not rushing the placement.
Why does my review widget show in the theme editor but not on my live store? +
Three usual causes, in order of likelihood. The app embed toggle is switched off, so the widget cannot load its data. The block was placed on a draft theme rather than the published one. Or the block is there but the app is set to hide the widget on products with no reviews yet.
Do I need to add the reviews block to every product template? +
Only to each template that is actually in use. The Default product template covers every product that has not been assigned a custom template. If you built a separate template for a specific collection or product type, that one needs its own blocks.
Will reviews on my Shopify homepage get me star ratings in Google? +
No. Google asks that review markup describe a specific item rather than a category or a list of items, so homepage and collection page reviews will not produce a star snippet. Those placements are for shoppers, not for search. The stars in search results come from the product page.
What happens to my reviews section if I change Shopify themes? +
Your reviews are safe because they live in the app, not the theme. The blocks are not safe. App blocks are placed inside a specific theme, so switching themes or accepting a major theme update leaves you with the reviews still in the app and nothing rendering on the page. Re-place the blocks in the new theme before you publish it.
Can I have two review apps installed on Shopify at once? +
Technically yes, but it is a bad idea. Your review count gets split across two databases, shoppers see two different averages for the same product, and the two widgets fight over the same space on the page. Pick one, import the other app's reviews into it by CSV, then uninstall the loser.
Should I add a reviews section before my store has any sales? +
Yes. Install the app and place the blocks while you have time, so the first review has somewhere to land the day it arrives. An empty reviews block is not a problem. Most apps hide the star rating badge until a product has at least one review, so nothing looks broken while you wait.